How can I recover my data off the dead MacBook – the commonly asked question when you have essential files on the crashed Mac and don’t have an available backup. You might want to ensure data safety before trying any solutions.
Or you’ve tried many fixes attempting to repair the crashed Mac without success, and the last straw is to format the disk or send it for repair, which will erase all data on the hard drive.
You may even decide to give up on the old Mac and opt for a new one. Regardless, data recovery for the dead MacBook is crucial.
If unfortunately, your Mac can’t power on at all, it will be tough to get your data back. Nevertheless, things are easier if your Mac still reacts to the power button though it won’t boot.
Here, we will elaborate on the feasible solutions to recover data from a dead or crashed MacBook. But before getting to the details of data recovery, let’s start with the reasons that may render your Mac not working.
Why is your MacBook dead?

For some users, Mac crashed after the macOS update. Others are clear that the spilled water caused the damage. Yet, some had the failure out of nowhere. To quote a user with a similar experience, “My M1 Mac is three months old and 50 charge cycles off, but it seems dead after I came back from fetching a cup of tea. It won’t boot or react to any keys.”
Overall speaking, your MacBook could seem or be dead if any of the following happens:
- System crash.
- Battery problem.
- Virus attack.
- Drive failure.
- Logic board issue.
- Unsupported external peripherals.
- Incompatible hardware/software.
It’s hard to determine the culprit without a thorough troubleshooting process, but you can rely on the general guide below to regain the inaccessible data.
Recommended for you: Top 10 Best Video Presentation Software for Windows and Mac.
How to recover data from a dead MacBook that won’t power on?

If your Mac is not responding after you pressed the power button and no fan noise or display is showing up, you should try to get it powered on first before starting data recovery.
Here are some basic tips to follow:
- Make sure your Mac is charging well. Check the power connection and wait a while for it to set.
- Switch to another power cable or adapter and ensure that they are tightly plugged.
- Unplug all peripherals connected to your Mac, especially an external display.
- Ensure that any newly applied hardware is compatible with your Mac and well placed.
- Force shut down and then restart your Mac.
- Reset the SMC (System Management Controller).
Suppose none of the solutions worked to make your Mac respond; there’s one thing you can try to recover the data – removing the hard drive from the dead MacBook and then putting it into an external hard disk enclosure. This way, you can attach the disk to another working Mac and access your data there.
Since tearing a Mac and taking off the hard drive requires the right tool and technical knowledge, it’s best to seek help from a professional technician or send your Mac to a data recovery center.
How to recover data from a dead MacBook that fails to boot?

In most cases, the seemingly dead MacBook can still power on but fails to start up correctly. And your data on the Mac hard drive is often intact unless your Mac has a fatal drive failure. So, all you need to recover files from the crashed Mac is access.
Following one of the methods below should help you access the data and safely transfer it to another location. It’s worth mentioning that you can also apply these solutions to recover data from crashed MacBook Pro and other Mac models.
Here is a brief takeaway to help you choose the best unbootable Mac data recovery method in a minute.
| Data Recovery solutions | Preparation | Experience |
|---|---|---|
| Remove the crashed Mac hard drive and install it on an external hard drive enclosure | Toolkit for taking out the drive; a fit external hard drive enclosure | May need technical assistance; free if you can DIY |
| Recover by creating a disk image | An external storage device | Easy, free, backup folders & APFS container (Intel Mac) |
| Recover with Mac Terminal | An external storage device | Fast if you know Terminal commands; free |
| Recover using Target Disk Mode | Another working Mac; a cable to connect two Macs | Easy to do |
| Recover from a bootable installer | An external storage device | Takes time to download & install macOS; free |
| Recover via data recovery tool | Choose the right product | Fast; third-party tool; paid product |
Solution 1: Recover data with disk images
An easy way to restore your data from the dead MacBook, yet few have mentioned, is to create a disk image in macOS Recovery Mode. Although you can’t create disk images of the APFS volume, you can back up the folders containing your important data and even the APFS container on Intel Macs.
Steps to create disk images in macOS Recovery mode:
1. Plug the external storage device into your Mac.
2. Boot into macOS Recovery mode.
Intel Mac: Shut down Mac, press the power button, then immediately press and hold Command + R.
M1 Mac: Shut down Mac, press and hold the power button until seeing the “Loading Startup options,” then choose Options > Continue.
3. Click Disk Utility > Continue.
4. Select File > New Image > Image from Folder from the top menu bar.
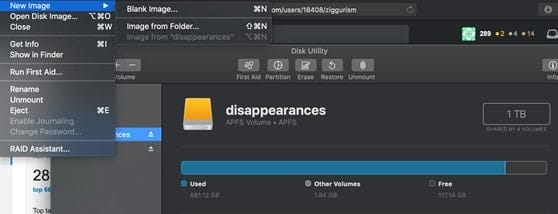
5. Choose the folder with the data you want to recover, then click Open.
6. Enter a name for the disk image and save it to your external device.
7. Choose whether you want to encrypt the image in the Encryption drop-down menu.
8. Choose Read/Write from the Format drop-down menu.
9. Click Save > Done.
Once the disk image is created, you can insert the external disk to a working Mac, and then double-click the disk icon automatically mounted on your desktop to view the contents inside it. If you can’t find the disk image on your desktop, go to Disk Utility and mount it yourself.
You may like: 10 Best Mac Apps You Should Install & Use.
Solution 2: Recover data with Mac Terminal
If you are comfortable with commands, copying files from the crashed Mac to another storage device by running Terminal commands is an excellent way to recover data from a Mac that won’t boot. Prepare an external device (such as a USB) that’s formatted to use on Mac, then follow these steps:
1. Attach the external storage device to your Mac.
2. Boot into macOS Recovery mode.
If your drive is FileVault encrypted, follow step 3. Otherwise, jump to step 9.
3. Click Utilities > Terminal.
4. Copy the following command and hit Enter. (diskutil apfs list)
5. Locate the section where it writes “FileVault: Yes (Locked).
6. Note down the disk identifier (such as disk1s7) next to the “APFS Volume Disk” field.
7. Type in the following command, replace the disk identifier with the one you saved before, then hit Enter. (diskutil apfs unlockVolume /dev/identifier)
8. Enter your FileVault password and press Enter.
9. Use this command to list all volumes on your Mac. (ls /Volumes/)
10. Input this command to move files of the user folder named Jenny to the external disk called the backup disk. (cp -R /Volumes/Macintosh HD/Users/Jenny/ /Volumes/backup disk/)
Don’t forget the space in the commands and use a backslash to separate words of a name.
Solution 3: Recover data with Target Disk Mode/Share Disk
The Intel-based Macs have a boot mode called Target Disk Mode that’s especially useful for retrieving contents of a Mac that can’t boot up normally from its own operating system. M1 Mac has a similar feature named Share Disk.
Target disk mode or Share Disk transfers the crashed Mac into an external hard drive that can be accessed from another Mac or PC.
While you can physically connect the dead MacBook to a PC, the PC can’t read the hard drive without a third-party tool as Windows computers use different file systems. Therefore, it’s advisable to get another Mac for this method to work.
Steps to recover data via Target Disk Mode on Intel-based Mac:

1. Connect the two Macs with a proper Firewire or Thunderbolt cable.
2. Shut down the unbootable Mac.
3. Turn on the Mac, then immediately hold down the T key.
Once the unbootable Mac is in Target Disk Mode, you should see its hard disk icon appearing on the working Mac.
4. Double-click to open the hard drive of the failed Mac, then copy the crucial files to the working Mac or another device.
5. Eject the hard drive of the unbootable Mac.
6. Turn off the problem Mac and unplug the cable.
Steps to recover data via Share Disk on M1 Mac:
1. Connect both Macs with a qualified USB, USB-C, or Thunderbolt cable.
2. Shut down your Mac.
3. Keep holding the power button until a message saying “Loading startup options.” shows up.
4. Click Options > Continue.
5. Enter the password if asked.
6. Select Utilities > Share Disk.
7. Select the volume where the essential files are stored, then click Start Sharing.
8. Open Finder on the working Mac, then click Network from the left sidebar.
9. Double-click the Mac you use as the external disk, click Connect As > Guest > Connect.
10. Transfer the critical files.
11. Eject the disk properly.
Solution 4: Recover data from a bootable installer
If Terminal seems intimidating and no other Mac is available, you can access the Mac hard drive by creating a bootable installer using an external storage device like a USB. Please follow these steps to create and recover data from an external bootable drive:
1. Plug the external device into your Mac.
2. Boot into macOS Recovery. (If you have issues restarting in macOS Recovery, try Internet Recovery mode.)
3. Click Disk Utility from the macOS Utilities window.
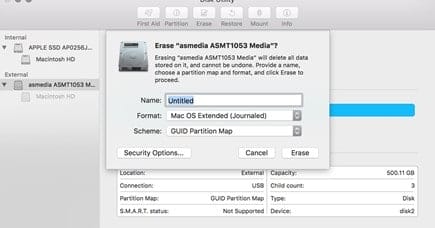
4. Select the external drive and click Erase.
5. Choose GUID Partition Map as Scheme.
6. Choose APFS as Format for macOS 10.13 or later and Mac OS Extended (Journaled) for macOS 10.12 or earlier.
7. Click Erase again.
8. Exit Disk Utility and select Reinstall macOS.
9. Follow the pop-up instructions to install the macOS to the external drive.
10. Once it’s all set up, click the Apple logo > Restart to reboot your Mac, then immediately press and hold the Option key. You can release the keys when the startup disk options appear.
11. Select the boot drive and click Restart.
12. Locate the files you want, then copy them to the external drive.
If the Mac hard drive doesn’t appear in Finder, launch Disk Utility, select the internal disk and click Mount.
Solution 5: Recover data using Mac data recovery software
A reliable Mac data recovery tool can also recover data from an unbootable Mac at a price. If you are willing to invest in one, choose a brand with a good reputation and meets the following requirements:
- The software is well maintained and keeps pace with Apple’s operating system release.
- The software should have an intuitive interface.
- The software should support all standard file formats, your macOS version, and various data loss scenarios.
- The software should be able to recover data from macOS Recovery without spending extra time to create a bootable installer.
You may also like: 11 Common MacBook Problems and Methods to Solve Them.
Prevent data loss in the future

If you have had a backup of the crucial files on your Mac, you could’ve saved yourself all these hassles for getting them back. So, the most important lesson here is always to keep your Mac backed up. There are various backup methods to choose from. You can select the built-in Time Machine, a Cloud service like iCloud, or a third-party backup tool, whatever suits you best.