You know that rare feeling when you see a web design and every word pouring out is ”Oh My God What a Stunning Page”. To make your design and codes hit that sweet spot can be laborious!
This is why every designer and developer is always on the lookout for tricks and tips that can help them invade all the aspects of designing and developing with absolute authority. Segue on to know about a few:
Restless Colors:
 When the modus operandi to bring about the look is through using cohesive color schemes, there is a way to cheat the redundant intricacies. Select a different band of colors as per your wish (purple, red, brown, etc.) Now pick one color that will serve as a tint for the overall design coloring. If you wish to get a little cheeky pink or orange will do the trick for you. At times, you would like your design to give out a more sedate vibe. For that scenario darker colors will prove to be resourceful. For adding a touch of softness however, go for white that can be equally sober. Then it comes to coating what you have after tinting. Try some different blend of colors on the opaque surface you have, and keep the process going till you get something that’s comes closes to what you would like to take forward. The combination you are likely to come up with makes an instant personal connection.
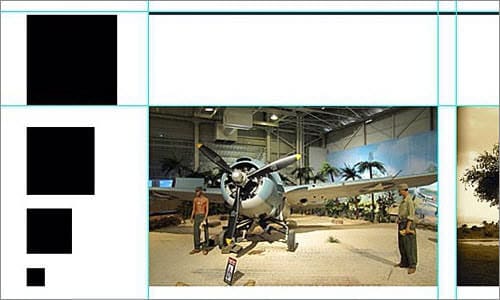
Space out like this:
 How you align and space out the design elements goes a long way in determining the overall quality of your design. One of the tricks you can use to lend some cleaner vibe to the design is by creating squares for the spacing between different elements in the design roadmap. Segregating everything with the help of squares helps you make significant savings on time, and at the same time, lets you more seamlessly align different elements in harmony with each other. An experienced designer fully realizes how stretched things get when he or she is trying to put different building block at their right place.
Sharpen Images Using ImageMagick:
 ImageMagick is essentially a command-line program that treads a familiar territory while honing the images, but gives them a twist with its dynamism of operations, bringing the characters inside the images to life. If you have an image that you deem too small or blurred for use on your blog or forum, don’t discard it before you try ImageMagick. It resizes the images while keeping pixels rich, thus bolstering the sharpness of the image. The tool is excellent for images that were downsized previously for some reason. There is a lot of set up to the whole working of ImageMagick. The different elements scrolled while it goes about its business include Radius (which adjusts the pixel distance), Sigma (it takes as input the size of the image), Amount (as the name suggests, it lets you decide the amount with which you wish to sharpen the image), and Threshold (it makes sure you do not go overboard with sharpening and end up making it granular).
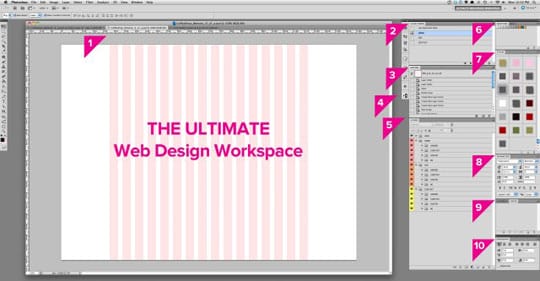
Setting Up an Incredible Photoshop Web Design Workspace:
 You create a workspace whenever you name a plane of specific size and position in Photoshop and save it in the application bar. To begin the process, you start with a blank canvas. It would be great if you use 960 GS. Width can be adjusted at close to 15000 pixels. Now, make way for Layer Comps, wondrous tool that saves tones of time, while making the process of making presentations seemingly easy. You can keep taking snapshots just to be on the safer side. No matter what, do not let FontShop & Extensis be out of your sight. These are extremely useful utilities to view web fonts in Photoshop. Before you proceed, increase the process feasibility and ease by breaking each page down into folders and layers. The Swatch Palette will ensure a consistency while using different colors in the design; while the style Window lets you add and edit colors and effects. Make sure you give the Character window the attention it deserves as it fixes the basic text setting like font size and all. Clutter may often creep into the design, and in order to make sure it doesn’t creep into your design, use Paths & Channels that can adjust different shapes, paths and shapes and let design elements breathe. The importance of Paragraph is well documented, for it helps you in setting margins, hyphenation and justifying the text.
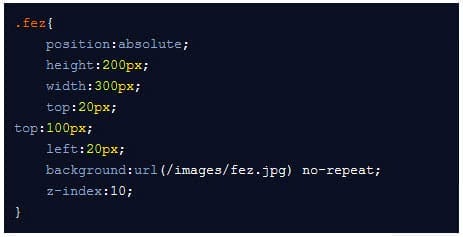
Freeing up the CSS:
 While you are carrying on the debugging process or fidgeting with the CSS, you are most likely to experiment with several properties that only add to the crowd of redundant things you have on the screen. However, it is imperative you clean up the mess before the CSS goes live. Out-denting the temporary properties is a short-cut way of doing it. Set the position to absolute while keeping the height and width at 200 pixels and 300 pixels respectively. The margins at top and left can be adjusted at 20 pixels each. Set the desired background before you adjust the pixels for border (keep it 2) and the color of your choice. The most ideal z-index value can be set at 10.
Keeping Favicon Right Next to Third Party Links:
 You can use the Google’s favicon service to solve the purpose. All you got start with is have a host name and a Top Level Domain (TLD). You can then use jQuery with these links and use Favicon as an image in the background. Round it off by using ‘this.hostname’.
Paying some Attention to the Corners:
 You can play up the traditional methods and play them to the gallery while rounding off the corners, or use some tricks, which seemingly don’t sound all that impressive, but give results far beyond your expectations. It is quite often you find a great looking design rendered repulsive due to the meandering corners. In order to get the corners perfectly nested, you have to carefully math it out. All the fieldsets have to be given proper values. The border radius of the two objects in your design should have the same value as the value of the gap between them. Keep the value of border radius greater than the padding value.
At the end of the day, it’s all about indulging in part creativity, part math, and you have a bonafide design on your hands.
This article is written by Jack Calder. He is a content writer by mood and a web designer by profession. He loves to share his thoughts & Ideas on various HTML to WordPress conversion services. You can log on to his business website (Markupcloud) for more information on various other PSD to WordPress conversion services.


