A review posted on your WordPress site can do wonders in exposing your business to a wider customer base. Also, reviews can influence your search engine rankings and help your website visitors gain trust in your business. Writing reviews isn’t a new concept and rather has been omnipresent as part of blogging experience since the very beginning.
So, if you’re persuaded at creating your own WordPress review site read on this post further to learn a simple and effective way that can help you in building such a website like a pro.

But Before You Start
Make sure to choose a reliable web hosting provider and a suitable domain name for your site. While you can find an ample number of good hosting providers; Inmotion Hosting and Media Temple are the two most popular choices worthy of your consideration to signing up for a hosting plan. Especially, Inmotion Hosting is the first option you should consider for hosting your site since it is one of the most recommended as a great hosting service for WordPress.

Once you’ve selected your hosting plan and domain name, your next step should be to install WordPress on your web hosting account. And then, you just need to follow the steps required for creating a niche review site in WordPress just like a professional.
NOTE: In case you already have an existing WordPress site, just move to the next section.
Step-by-Step Guide to Creating a WordPress “Review” Site
Step 1 – Pick the Perfect Theme for Setting up Your Review Site

This is the most obvious step when it comes to setting up your WordPress review site. Of course, you need a theme for creating the structure of your site. But, when you’re looking around the web for a WordPress review theme, focus on choosing one that perfectly suits your needs. Ideally, select a theme with a perfect balance between impressive design and superior functionality.
Most importantly, make sure not to pick any review site template blindfolded, or else you are likely to become a victim of spending money in a bloated theme. Not to mention, putting up a site with bugs can cause damage to your brand’s reputation among your target audience. That is why it is often advised that you must use WordPress review plugins that are compatible with any WordPress theme. In fact, choosing the right plugin helps add extra functionalities to your review site or helps in upgrading the existing functions, thereby eliminating the need to hire a WordPress professional.
Step 2 – Install and Activate a Worthy WordPress Reviews Plugin

You might have heard of the phrase too often stating, “There is a WordPress plugin for everything.” Undoubtedly, you can easily find a WordPress plugin that helps address your specific needs. In our case, I’ll be explaining the process of creating a review site using the WP Product Review plugin.
Though the WP Product Review plugin is free to use, it still offers a rich set of features essential for creating a leading review site. However, for utilizing additional functionality, you would have to purchase the add-on package available for the WP Review Pro version.
You can buy the premium add-ons package offered with WP Review Pro at $75. The premium version of the WP Product Review plugin is user-friendly and helps add schema markup on the WordPress review site, which eventually helps in creating a prominent place in search engines. Basically, it helps in adding star ratings immediately to the reviews posted in Google as shown in the image below:

So, now that you have understood the significance of installing the WP Product Review plugin, proceed further and install the plugin. After completing the installation process, you’ll see that a new menu item is added to your site’s admin dashboard menu labeled as “Product Review”. Clicking on this menu item will redirect you to the plugin’s Settings page that looks something like:
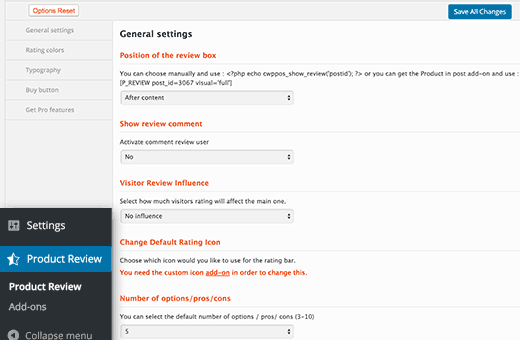
As you can see in the settings page, there are four different sections. Let’s talk about these sections one by one:
1) General Settings:
This section requires you to choose the place where you would like to add the review box. When it comes to positioning the review box, you’ll have to choose from three options:
- You can either display the box just above or after your website content. Or else, add the review box manually by placing the shortcode in the desired location.
- The second option lets you select whether you would wish to enable website users to add their reviews in the form of comments.
- Lastly, you only have to select the options, pros or cons that you would want to showcase. However, the WP Product Review plugin will enable you to display 5 options/pros/cons by default.
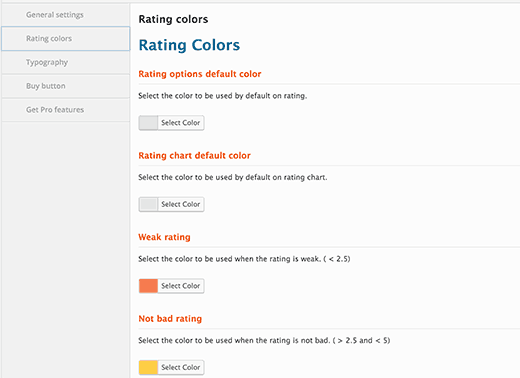
2) Rating Colors:
The next tab is where you need to define the colors that the plugin will use to display the ratings in your site. You will get color options for differentiating between different types of ratings like excellent, good, weak, etc.
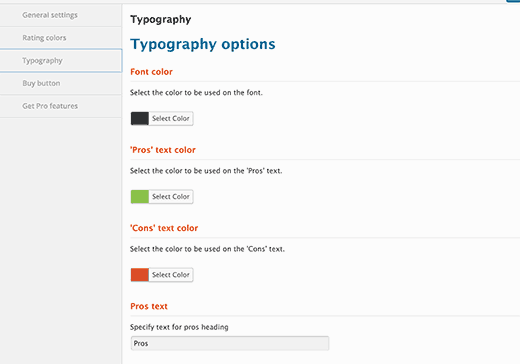
3) Typography:
Next, move on to the Typography tab that allows selecting the text to be displayed for pros or cons columns. Besides this, you even get to choose the color for the text added in each section.
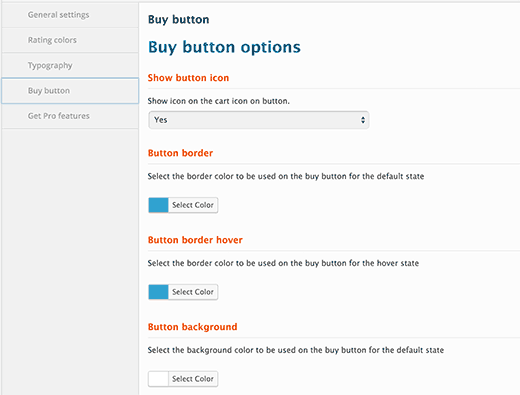
4) Buy button:
The final tab labeled the ‘Buy button’ lets you choose a color scheme for the buy button added on your review site. Since the button contains your affiliate link, make sure to select a color that increases the click rate of the button. In short, pick a color for the ‘Buy button’ that compels an increasing number of users to click.
Once you’ve made the required changes in the settings page, make sure to hit the “Save All Changes” button to save all your settings.
Step 3 – Start Adding Reviews in Your Site
Perhaps the most crucial step is to add reviews in your WordPress install using the WP Product Review plugin. For this, you’ll first need to edit any post or create a new one in your site.
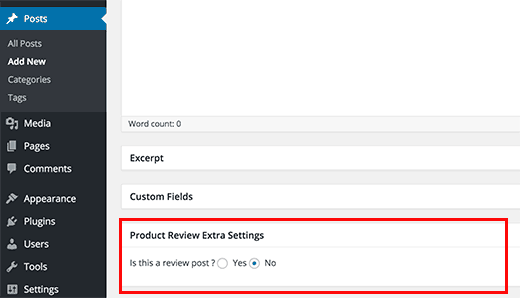
Begin with writing the main review just like you would for any other WordPress post. To do so, from your site’s admin dashboard menu click on the “Posts” option. This will open up the post edit screen, from where you will find a meta box named as “Product review extra settings”. Simply, click on the ‘Yes’ option corresponding to the “Is this a review post?” option:
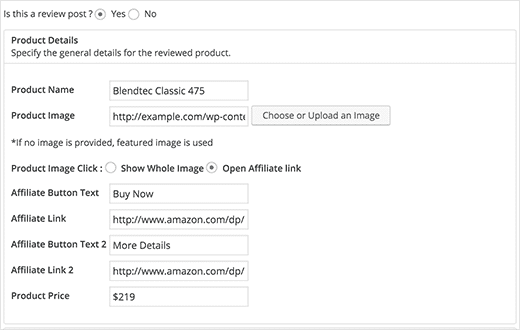
Your meta box will expand and start displaying additional settings for the review, which includes product details like product name, product image, affiliate button text, and others as follows:
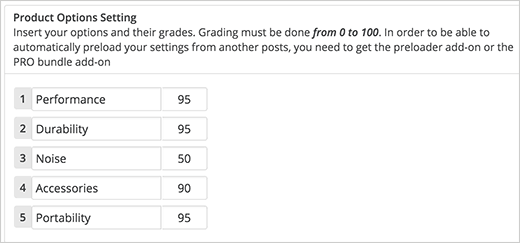
Next, you’ll be required to add your own product options as shown in the image below:
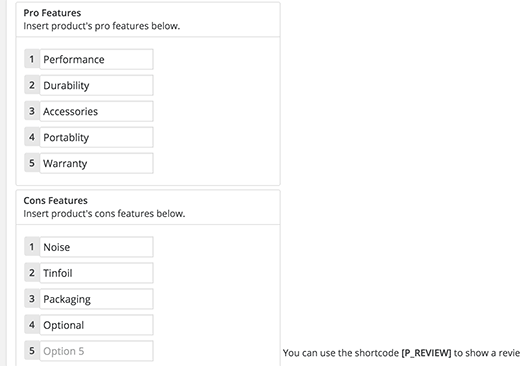
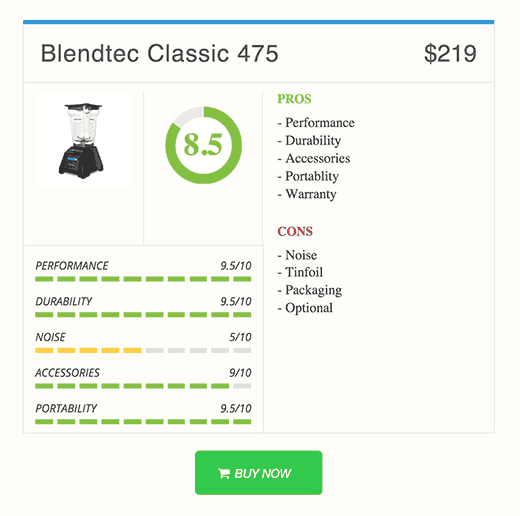
And at last, just add the list of pros and cons features:
Post this step, press the “Save” or “Publish” button for saving the post. This is how your review box will look:
Step 4 – Add Reviews in the Sidebar (or. widget-ready area)
Now you are just left with the task of displaying your reviews on the website sidebar. Thankfully, the WP Product Review even allows showcasing the review posts in the widget-ready areas like sidebars and others. For adding review posts in your site’s sidebar section, from the admin panel navigate to Appearance >Widgets page. The page contains all the latest and top widget from a list of already available widgets.
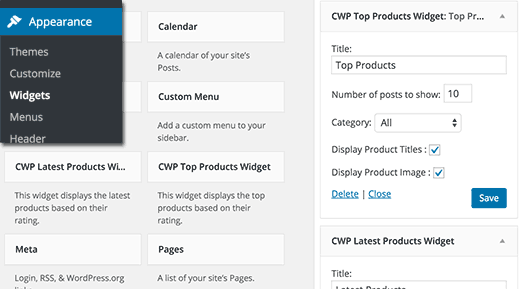
Just select and add the widget of your choice to the sidebar. And then, start configuring its options like the number of products, product title, etc.
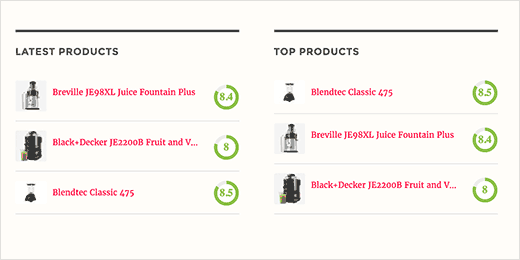
That’s it! After completing the above step, you will be able to see the reviews widget in the sidebar something like:
Conclusion:
Hope that the method shared in this post will guide you in building a review website with utmost efficiency.
This article is written by Lesa Cote. She is a WordPress developer cum blogger working at WebCX – a WordPress web development company. She loves to share her web development experience and knowledge with novice developer and bloggers. Follow Her: Twitter | Facebook | LinkedIn.


