Here in this article I will show you how you can implement a “Custom Default Avatar” in your WordPress installation.
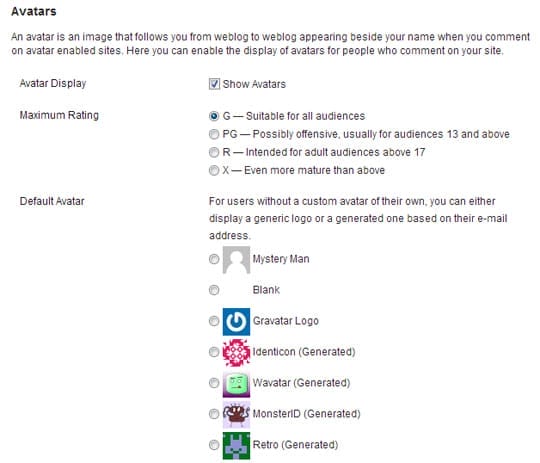
If you are an owner of a WordPress website then there is a 95% chance that you are already enabled the Avatar option. Although who do not know about this, can easily check this option by going to your “WordPress Admin Panel” => “Settings” => “Discussion”. Here you can find one option to enable “Avatar Display” along with some other options. Please check the image below (Picture 1), you can find similar options in your admin panel also:

WordPress currently uses one external avatar display service to display all avatars. The service is called Globally Recognized Avatar or in short ‘Gravatar‘.
If you go to “WordPress Admin Panel” => “Settings” => “Discussion”, you can find there is another option to set ‘Default Avatar‘. It means, if any of your website user or commenter do not have any Gravatar image, then this ‘Default Avatar‘ will display.
Now if you wish to use one custom default avatar in your website so it match your website theme or model, hare I am explaining one easiest way to it. Please try the following steps and you can able to set your own custom avatar in a few minutes:
STEP 1 :: Create Custom Default Avatar
Create you custom default image first. It is better if you create one square image. It is best to use one image with a dimension not greater than “200px X 200px”. Also make sure the image dimension is not less than “160px X 160px”. I personally always use one image with a exact dimension of “200px X 200px”. Here in this tutorial I am assuming that your newly created avatar image nae is “custom-default-avatar.jpg“. You can use any other name but in that case make sure to change it in the respective code.
STEP 2 :: Upload the custom default avatar image
Upload your newly created custom default avatar image (i.e. custom-default-avatar.jpg) under your theme’s images folder using any FTP software. Please do the following steps:
- Login to your server using any FTP software like FileZilla, CuteFTP or similar.
- Go to “/WordPressRootFolder/wp-content/themes/YourTheme/images/“.
- Upload you newly created custom default avatar image on the above folder.
STEP 3 :: Add code to functions.php file of your theme

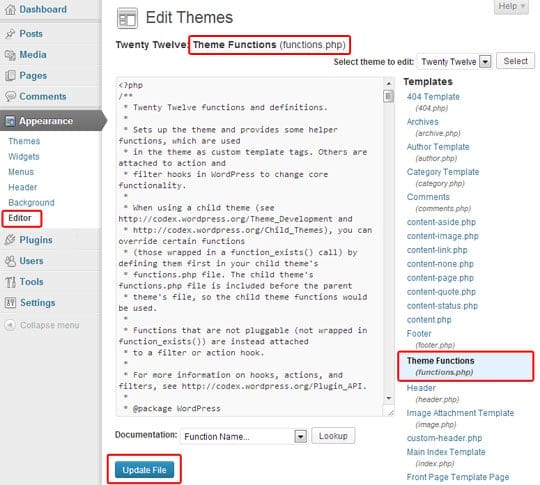
1. Go to “WordPress Admin Panel” => “Appearance” => “Editor”. (As shown in Picture 2)
2. Here in the screen on the right hand side you can find one list of pages that your template have. From that list find the file called “Theme Functions (functions.php)” and click on it. You can see now this “Theme Functions (functions.php)” page will available to edit. (As shown in Picture 2)
3. If you have a regular WordPress theme installed (like any custom theme) please do the following:
3.1. Add the following code at the end of this page “Theme Functions (functions.php)“:
/* Custom Default Avatar Start */
add_filter( 'avatar_defaults', 'newCustomGravatar' );
function newCustomGravatar ($avatar_defaults) {
    $myavatar = get_bloginfo('template_directory') . '/images/custom-default-avatar.jpg';
    $avatar_defaults[$myavatar] = "Custom Default Avatar";
    return $avatar_defaults;
}
/* Custom Default Avatar End */If you have a Child WordPress theme installed (like any theme framework or similar) please do the following:
3.2. Add the following code at the end of this page “Theme Functions (functions.php)“:
/* Custom Default Avatar Start */
add_filter( 'avatar_defaults', 'newCustomGravatar' );
function newCustomGravatar ($avatar_defaults) {
    $myavatar = get_stylesheet_directory_uri() . '/images/custom-default-avatar.jpg';
    $avatar_defaults[$myavatar] = "Custom Default Avatar";
    return $avatar_defaults;
}
/* Custom Default Avatar End */4. Then click on the “Update File” button to save the file “Theme Functions (functions.php)“. (As shown in Picture 2)
STEP 4 :: Change the Default Avatar Settings

1. Go to “WordPress Admin Panel” => “Settings” => “Discussion”.
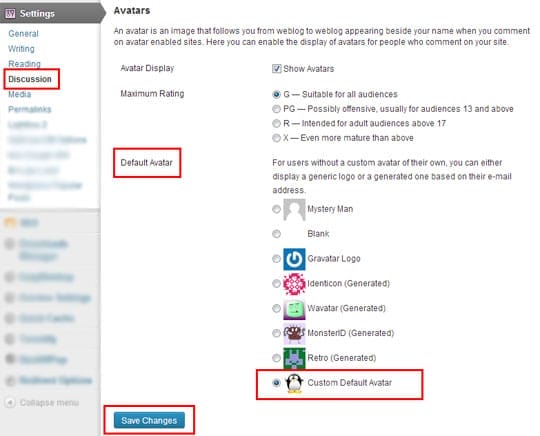
2. In this page there is a section called “Avatars” (As shown in Picture 3). Go to that section.
3. Under the “Avatars” section you can find another sub-section called “Default Avatar“. Under this sub-section you can see one new radio option is added named “Custom Default Avatar“. Choose this option and then click on “Save Changes” button to save the settings (As shown in Picture 3).
That’s all.
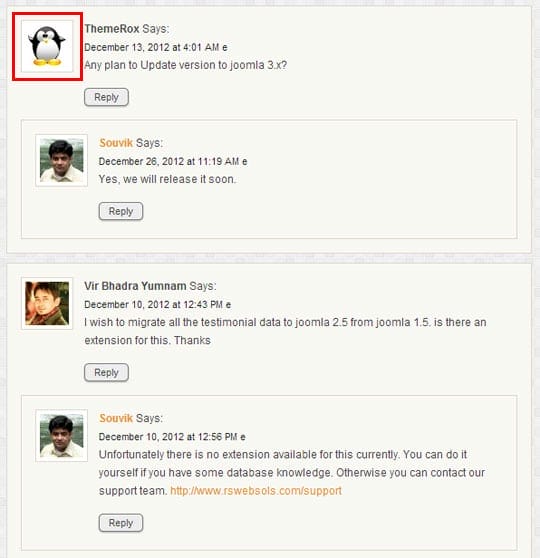
Your custom default avatar image is now ready. You will get some similar output like below image:

Now if you already have some comments on your blog and wish to check it is working or not, just go to your website and open any blog post that already have some comments. If some of your commenter do not have any pre-defined Gravatar image, then you can see your new custom default avatar image is assigned as the avatar of those commenters.
Try it. If you face any kind of problem feel free to post a comment about your problem. I will surely try to guide you to solve your problem.


